Showing posts with label freezer. Show all posts

Monday, January 7, 2013

Peanut Butter, Oatmeal and M&M Cookies


My cookie sheet doesn't fit in my new oven.

It turns out the oven in my new apartment is smaller than I thought. At least the fridge is full-sized. You wouldn't believe how many over-priced Brooklyn apartments have mini-fridges, the kind it's really only appropriate to have in a college dorm or next to your desk at your office.

This would not have been a problem had I noticed in advance or had I decided to make cookies when cooking stores were still open. But no, I only noticed when I was trying to shove a cookie sheet full of cookie dough (that had already been chilling for 5 hours, as per Matt and Renato's instructions) into the oven. It didn't fit. Either direction. It wasn't even close.


Yes, I could have given up and decided to just eat the raw cookie dough.

I won't lie.

I did do a bit of that.

But instead, I decided to get creative.

I used my toaster oven's baking try. It holds two cookies at a time for 12 minutes of baking and 8 minutes of cooling on the pan immediately after. I made about 20 cookies before I gave up and decided to freeze the remaining dough.


I'm glad I went ahead with baking. These cookies are incredible. They're moist and chewy, a fantastic combination of chocolate chip, peanut butter and oatmeal cookies loaded with chocolate.

These are not your mama's cookies. One cookie is about the equivalent of two normal-sized cookies, but I won't tell if you decide to have more than one.


Saturday, November 3, 2012

Vegetable Pot Pie and a Changed City

It's been crazy living in New York City for the past week since Hurricane Sandy hit.


Our sense of normalcy has been upended.

I weathered the storm at a friend's house, with full power, incredible food, and lots of crafting. I took a cab home from their house on Tuesday afternoon, and we drove by downed trees, crushed cars and signs warning us to keep out of the parks.

I returned home to a neighborhood that was relatively untouched, other than branches and leaves littering the streets. Restaurants, bars and coffee shops were all open and flooded with people who were unable to get to their jobs in Manhattan.


We ate, laughed, went for long walks and cooked. It felt almost normal at first, almost like a vacation.

But then we turned on the news and saw such wide-spread devastation that didn't fit at all with the reality we were living. We received emails about coworkers who had lost their homes overnight. We volunteered at local high schools housing hundreds of displaced citizens, some of us serving breakfast or working overnight shifts and others providing entertainment to people who so badly needed a break from reality. We saw low-wage workers desperately in need of their paychecks walk across the boroughs to their early morning jobs.


It's days like these when all I want is comfort food.

Like this pot pie. We made a huge batch of pot pie filling and pie crusts on our fourth day off of work because of Hurricane Sandy. We cooked with the TV off, with our phones that had been constantly feeding us updates on the state of our city tucked far away. 

These pot pies are loaded with potatoes, carrots, peas, lima beans, corn and onions, smothered in a homemade gravy, and topped with a savory pie crust. We made eight, baked them until they were almost done in the oven, and then froze them.


The recovery from Hurricane Sandy will not be quick. I worry that when most of us have our lives back to normal, when gas stations once again have gas and subway lines connect us through the boroughs, our efforts to help those who will remain in need for a long time will decrease.

As a school, as a community, as a city, we must keep asking, "How can we help?" 

If you're interested in donating to a local organization doing fantastic work supporting rebuilding  Red Hook, Brooklyn, consider the Red Hook Initiative: rhicenter.org. 


Friday, July 13, 2012

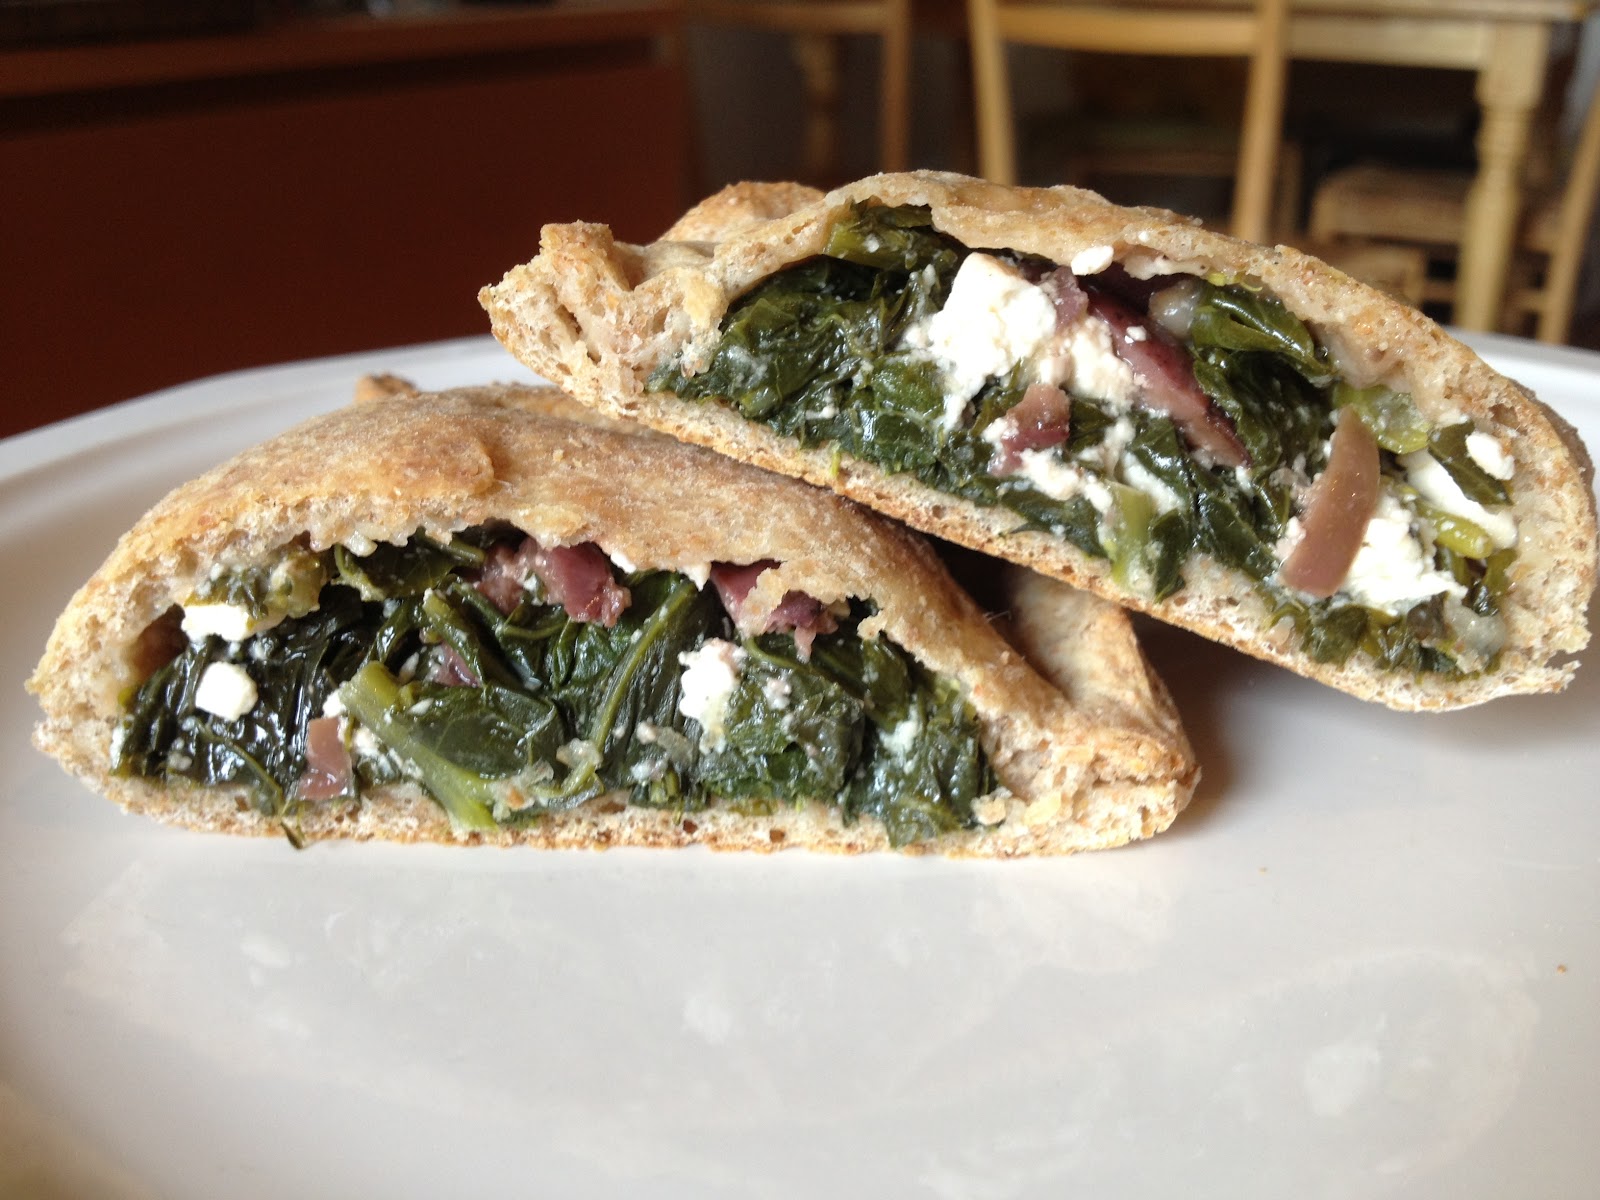
Broccoli Rabe, Feta and Olive Calzones

I worked at a health food store in high school, mostly 4:30 to 8:30 p.m. shifts. I'd go straight from school to cross country practice, run for an hour, and then throw my normal clothes back on and drive to work.


By the time I got there, I'd be starving. But because my shift was so short, I'd only get a 15 minute dinner break.

So, I'd usually choose an Amy's Pocket Sandwich. They were one of the cheapest meal-like products in the store, which fit my limited budget perfectly. They microwaved up in 2 minutes, so I could stick them in the microwave when my break started and still have a whopping 13 minutes left to eat. And they were pretty tasty.


But lately, I've really been making an effort not to eat prepackaged food. If I want something, I've decided I should make it myself.

Or buy it while I'm out to eat. A girl has to be reasonable.

These calzones are an attempt at that. I made six lunch or dinner-sized calzones, stuffed with a filling of broccoli rabe, feta and olives. I baked them up in a half whole wheat crust, cooled them completely and froze them.


They're my own frozen dinners, except I know exactly what's in them and how they were made. With the heat here, they'll be perfect for those days when I just can't bring myself to turn on the oven.

What would you stuff your calzones with?

Wednesday, June 27, 2012

Chocolate Peanut Butter Pie with a Pretzel Crust

Remember when I blogged about how Justin's peanut butter cups were maybe the best peanut butter cups ever?

I know. You're probably rolling your eyes right now.

Really Katie, you're saying to yourself. You're blogging about chocolate and peanut butter AGAIN? What about it? 


Well... I just had a Nectar Nugget Dark Chocolate Peanut Butter Cup, and I think I'm in love.

Really?

Yes. Really. And they inspired this delicious dessert that's in my freezer right now.

More chocolate peanut butter? Is that even healthy?

Of course. It's filled with protein. I'm not sure what it is I love about it, but I just can't help myself.

But Katie, the farmers' markets are filled with beautiful fresh fruit right now. This week there were raspberries, strawberries, blueberries, cherries, and grapes will be back soon. 

I should be cooking with all of those while I can, I know.

You can have chocolate peanut butter anytime. 


But it's all I want! It's the sweet I crave above all others. 

Another chocolate peanut butter recipe? Is it any different than the COUNTLESS others you've already posted? 

It is! It is! This one has very little chocolate, a huge layer of creamy peanut butter, a crunchy and salty pretzel crust and it's chilled. Perfect for summer.


Ok, ok Katie, I get it, you're saying. Is there a slice for me?

Yes, yes there is. Come over soon and you can have some.


Sunday, May 20, 2012

Black Bean and Swiss Chard Mexican Lasagna

Last Sunday, my friend Casey suggested I make baked eggs for dinner. Truth be told, they sounded delicious. A bit of heavy cream, topped with whatever cheese and herbs you have handy. Crack an egg or two over the top, and bake it all in the oven. You get a runny yolk that spills over onto the cheese and herbs.


Yum.

There was just one big problem. Baked eggs don't reheat well.

If I made baked eggs for dinner Sunday, I'd have no lunch option come Monday. Or Tuesday. Or Wednesday.


I'd be forced to reheat an Amy's frozen burrito, or wait in line behind twenty children to buy a bagel and cream cheese. And, since it was only Sunday, I knew I'd be facing a whole week of that kind of eating if I didn't prepare something more practical tight away.

This lasagna certainly falls under that category. It's a layered dish, with layers of tortillas, queso fresco, swiss chard and mushrooms, and black beans and corn. Not the first dish most people conjure up when they hear the word lasagna.

Delicious nonetheless.


This dish is hearty and healthy. It comes together quickly (particularly if you cheat a little with store-bought enchilada sauce like I did). I made enough for two lasagnas and threw one right into the freezer before baking it. The perfect solution for the next week when I'm not sure what to make on a Sunday.

Thursday, May 17, 2012

Broccoli-Basil Macaroni and Cheese

*My Baked Explorations Cookbook Giveaway ends at 11:59 p.m. Friday night! Just tell me about your favorite cookbook for a chance to win!*

I tried to help my friend's three year old daughter wash her hands in the bathroom at the coffee shop last weekend.

I am clearly not a mother.


I struggled to hold her up with one hand and then turn the faucet on. I wasn't certain how hot to make the water (though she couldn't have cared at all that the water was lukewarm).

When trying to squeeze soap into her hand, I knocked the pump off of the bottle not just once, but twice.

And I dropped a whole bunch of paper towels into the sink.

She just laughed. She thought it was hilarious.

I realized I have a lot to learn about being a mother.


That's why I decided I needed to do some research before I brought new parents a meal. The advice I read in blogs made sense. It needs to be a meal that's easy to prepare, that doesn't require a lot of extra add-ins that you're not sending along. It needs to be something that keeps for a while (frozen is great), so if they can't get around to it that day, it's fine. And it needs to be something that's easy enough to eat one handed.

Broccoli-basil macaroni and cheese it was. I loaded it with whole wheat pasta, two kinds of cheese, and a ton of different veggies, including half a head of broccoli on top.


I made one for the new parents.

And I made one for myself. :)

I figured if I was going to all the trouble, I might as well have one to enjoy. And I wanted to make sure it tasted alright before I delivered it.

It did. And one batch was enough for about 8 servings, with sides. Always a bonus.

Tuesday, May 8, 2012

Black Bean Veggie Burgers

I'm not your textbook vegetarian. I don't stock my fridge with tempeh, tofu and seitan, though perhaps I should.


I can't stand the taste of fake meat. If I'm not eating the real thing, then I don't want anything like it. Fake hot dogs just gross me out, though admittedly I've never been a hot dog fan.

And until a few days ago, I had never made my own veggie burgers.

It almost seems shameful to admit.


Sure I've eaten plenty of them, those easy, frozen ones you can buy at the grocery store and the particularly delicious ones served at some of my favorite restaurants (who wouldn't love a veggie burger topped with pineapple and a fried egg?).

These black bean veggie burgers are just delicious. They come together in a few minutes in the food processor, and you probably have most of the ingredients for them in your pantry and fridge.


I'm not sure why I didn't make these before.

Mark Bittman's recipes make throw-everything-together recipes like this a cinch. Any beans, any nuts, any add-ins, all thrown together, and you've got yourself one tasty burger.


Thursday, May 3, 2012

Zucchini Carrot Coconut Cream Cheese Muffins

Blue Sky Bakery has me spoiled. I used to think a really great muffin could be just one flavor.

Blueberry. Pumpkin. Lemon. Chocolate. Chocolate chip.


Not anymore.


Every Blue Sky muffin has at least three different components to it. On any given day, they'll have blueberry-pineapple bran muffins, pumpkin-apple walnut muffins, and chocolate chip, peach and raspberry muffins, to name just a few favors I've seen (and tried).


They're unique and complex, and they're certainly worth the lines on the weekends. The only downside is, they don't open until after I'm at work on weekdays.

So I had to attempt a muffin of my own that Blue Sky would be proud of.

Here it is: a zucchini and carrot muffin, stuffed with barely sweetened cream cheese and topped with toasted coconut flakes.


Every bite has something a little different to it, either with taste or with texture, and I think the appearance is just delightful.

Best of all, I froze all of these muffins after baking them, and they reheat in the microwave in about 45 seconds. That means they fit into my breakfast schedule.


Sunday, June 5, 2011

Basic Pizza Dough

I haven't had a pizza dough recipe I just loved for a long time. I've made Smitten Kitchen's Really Simple Pizza Dough several times, and while I'm always satisfied with the finished product, the 3/4 teaspoon of yeast her recipe calls for has never been enough for my pizza dough to rise the way I want.


I picked up some broccoli rabe at the farmers' market, and found this recipe for pizza with broccoli rabe. I needed a new pizza dough recipe fast, and The New Basics Cookbook didn't disappoint.

The dough came together easily (with the same ingredients as the Smitten Kitchen pizza dough mentioned above). It called for an entire packet of yeast, which resulted in a bread that was almost exploding out of the rising container after an hour. The dough was soft and pliable.


I think the men throwing pizza dough into the air at the pizzerias of my childhood gave me a false confidence. Since I had seen them shape so many pizzas, I assumed I could do it perfectly as well. However, several misshapen, uneven pies later, I realized I needed to read up about how to actually shape a pizza.

Again, The New Basics Cookbook was there. After I had separated the dough into two balls, I let it rise for 15 to 20 minutes. Then, I started with a ball of dough and shaped it into a 6 or 8 inch flat disk. Then, I flipped the disk over and laid it on a lightly floured surface. Using the palm of my hand, I worked in a circle clockwise, stretching the dough out to form a perfect circle. Once I had the circle my desired size, I pressed my fingers along the edge of the dough, creating a more pronounced crust.


Overall, I was delighted with this pizza dough recipe, and I'll return to it again and again. I'll definitely divide it into three even pieces next time since I prefer my pizza a little thinner.


Thursday, May 26, 2011

Lentil Sambusas

For my Ethiopian birthday feast, I knew I wanted to start with appetizers. However, in all the food blogs and restaurant menus I scoured, I had a hard time finding Ethiopian appetizers that weren't just toasted injera with spices. Then, I stumbled across these lentil sambusas on the menu of an Ethiopian restaurant in New Jersey.

These are the lentil sambusas with puff pastry dough. The lentil sambusas with phyllo dough were cooked and eaten before I remembered to take out my camera. 
I hadn't cooked much with phyllo dough, so I did some research to find out how to best work with phyllo dough and how to fold those perfect little triangles. Here are the highlights from what I learned:

Defrosting the phyllo dough: Once you buy phyllo dough, place it in the fridge for two days to defrost it. This allows it to defrost slowly and completely. The dough can stay in the fridge defrosted for up to a month. Avoid refreezing the dough.

Butter, Butter, Butter: Have plenty of melted butter and a pastry brush or paper towel on hand. Each sheet benefits from a generous application of butter. Butter helps the phyllo dough stick together, and it adds a little flavor to the finished project.

Folding perfect phyllo triangles: Sydney's Kitchen TV had a great guide to folding the triangles that I found helpful.


Freezing the unbacked triangles: Lay the unbacked triangles out on a parchment-lined baking sheet. Place in the freezer for about an hour. Once triangles are frozen, place into ziplock bags to store. I stored them for a few days this way, but you could certainly store them frozen for longer.


Somehow, despite all this research about phyllo dough, I ended up buying puff pastry. Big disappointment in terms of quantity. I was only able to make about 12 little triangles out of the puff pastry. I bought phyllo dough the next day, let it defrost for the requisite time, and was delighted with the results. Both batches tasted delicious, though, so it would definitely be up to you which you wanted to use.

The make-ahead nature of these sambusas made them the perfect start to a complicated dinner.

Monday, May 16, 2011

Roasted Rhubarb Vanilla Ice Cream

I came home from the farmers' market on Saturday with a beautiful bunch of fresh red rhubarb stalks and no strawberries. It's still so early in the strawberry season, and they were selling at the market this week for eight dollars a pint, so I resisted. In hindsight, that decision ended up being a hidden gift, because it forced me to move beyond strawberry-rhubarb pies, galettes, and crumbles to come up with a more creative recipe using rhubarb.

Roasted rhubarb puree
A quick phone call home to chat with my dad yielded this recipe for Savory Rhubarb Lentil Dal from Mark Bittman. Interesting idea, but the idea of the first rhubarb of the season just disintegrating into a dish just seemed disappointing. I wanted this rhubarb to pop!

That's when I stumbled across this delightful blog by Tom from Tall Clover Farm, where he posts about the fruit he grows and the pies he makes. He'll also give you advice about how to set up your own compost bin and he'll tell you where to find the cute new raincoats his dogs are sporting.


Most importantly, he taught me how to make my first cooked custard ice cream. I've been eyeing cooked custard ice cream recipes since I got The Perfect Scoop: Ice Creams, Sorbets, Granitas, and Sweet  and Accompaniments and an ice cream maker for my birthday from my New Jersey relatives! I've made several of his Philadelphia ice cream recipes, which are uncooked, to great success, but I haven't attempted his multi-step custards.


Tom's recipe made it seem so easy, and it was! His step-by-step directions and gorgeous pictures drew me right in. What could be better than a vanilla custard ice cream with roasted rhubarb puree mixed in?

To determine whether the custard is fully cooked, run your finger down the spatula. If your finger leaves a path that is not quickly filled in by custard, it's ready!
This ice cream is full of flavor and so tasty. It was hard to balance scooping it into freezer containers and tasting! Now to figure out what to serve it with..... a post on that to come later!


Saturday, May 14, 2011

bialys (or the incredibly relaxing day that took a sudden turn when I exploded a glass pan in my oven)

I didn't wake up this morning intending to bake bialys.


I planned on making bagels. But when I pulled out my computer to check how much flour I needed for smittenkitchen's homemade bagels, the bialys just caught my eye. A lighter version of the bagel, chewy and soft, topped with carmelized onions. YUM.

The bagels would have been the practical choice. The recipe yields 16 bagels, which keeps me fed for breakfast for a few weeks. The bialys, on the other hand, yield six, and I knew going in one would disappear the moment they were removed from the oven.


But, I had only ever had bialys once in my life, and they somehow seemed more fitting, more exciting, for a Saturday. Also, the bagels required an overnight stay in the fridge, and ours is just overflowing with fresh produce. Not that we're complaining.

Bialys are not particularly quick to make. You're looking at about 5 hours, when you include rising time. However, the process will take longer if you decide to bake a batch of oatmeal pecan chocolate chip cookies in the middle.


The process will take even longer if, upon placing the bialys onto the baking stone, you go to add ice cubes to the glass baking pan you placed on the floor of the oven (to release steam which would simulate a real bread oven), and the moment you add those ice cubes, the glass pan explodes. Suddenly, my relaxing Saturday vanished.


Imagine the scene. There I was, oven door hanging open, degrees of heat escaping each second, staring at the exploded glass all around me. My major concern: could I still cook my bialys with all the glass in the oven? After consulting with my roommate, I shut the oven door, glass grating as I closed it, and proceeded to bake the bialys.

They were deliciously and miraculously glass free.


My oven is cooling and covered with glass I need to clean up.

Bialys
Recipe adapted slightly for the chef without a stand mixer from smittenkitchen and The Bread Bible

This recipe yields six bialys. They store on the counter for about a day, but they also freeze well. I wrapped most of mine up in plastic wrap and put them in a container in the fridge. I'll defrost them one by one when I need them, thawing them right in the plastic wrap. If you have a stand mixer, make sure to read the smittenkitchen version of the recipe, which will save you a little time and a lot of energy.

Ingredients
2 cups bread flour (I like King Arthur's)
1/2 teaspoon instant yeast
1 teaspoon salt
3/4 cup plus 2 tablespoons water, at room temperature

Onion-Poppy Seed Filling
Ingredients
2 1/4 teaspoons olive oil
6 tablespoons onion, chopped
3/4 teaspoon poppy seeds
1/4 teaspoon sea salt
Black pepper to taste

Mix the dough. Whisk the flour and yeast together in a bowl, and then whisk in the salt (Deb's note was that yeast is killed when it comes in direct contact with salt, so it's crucial for the salt to be whisked in second). Add water, and stir until just combined. Turn the mixture out onto a lightly floured counter, and kneed constantly for at least 10 minutes, until the dough is soft and easy to work with. Add a little flour or water if necessary.

Place the dough into a lightly oiled bowl. Press the dough down and lightly spray or oil the top. Cover the container with plastic wrap. Mark the side of the container with a rubber band at approximately where double the height of the dough would be. Place the dough in a warm spot, ideally between 75 to 80 degrees, for 1 1/2 to 2 hours or until it is doubled.

Press down on the dough firmly to deflate it, and transfer it to a floured counter. Cut the dough into 6 equal pieces. Cover 5 of the pieces with a moist towel. Round each piece by pulling the dough ends together to form a pouch (trying to keep as much air as possible inside the dough), and then pinch the edges together. Put them on a floured baking sheet, pinched side down. Flour the tops and cover with plastic wrap.

Let the bialys rise for 2 hours at 75 to 80 degrees until almost doubled. When pressed lightly in the center, they should keep the impression. If you don't think the dough has risen enough, you can cut a make a small hole in the center before adding the filling.

While the bialys are rising, making the onion-poppy seed filling. Heat the oil in a small saute pan. Add the onions. I sauteed mine over low heat for about 45 minutes to caramelize them, but you could also do a quick five minute cook over medium heat until translucent. Remove the onions from the heat, and add the poppy seeds, salt and pepper to taste. Let the mixture cool.

Preheat the oven to 475 degrees about 30 minutes before baking. Place a baking stone or baking sheet on an oven shelf at the lowest level. Place a sheet pan on the floor of the oven before preheating it (use a metal pan, use a metal pan, use a metal pan. DO NOT use a glass pan).

Holding each piece of dough with both hands, with your thumbs in the middle and almost touching, pinch the center of the dough tightly between your thumbs and first two fingers and stretch the dough to 4 1/2 to 5 inches in diameter, creating a crater in the center. Place it on a lined baking sheet (I put mine on a sheet of parchment paper on the baking sheet so I could slide it right off onto my baking stone), and spoon 1 teaspoon of onion-poppy seed filling into the center.

Use a peel or cookie sheet to slide the parchment with the bialys on it onto the baking stone or sheet that has been pre-heating in the oven. Toss a handful of ice cubes in the sheet pan on the oven floor (I tried this, for the first time even, which is supposed to help make your oven closer to a professional bread oven by releasing steam which helps form a crust. Immediately shut the door.

Bake for 6 to 10 minutes, or until pale golden and mottled with brown spots.

Remove the parchment from the oven and, with a pancake turner, transfer the bialys to a wire rack to cool until just warm.

Enjoy!